Hi everyone! I have gotten a couple of comments on my marshmallow lace pullover on Ravelry
saying that the it was confusing, so I wanted to say a couple things
about the pattern - first of all, if you've tried it, please please let
me know what I need to do to make it clearer! It would mean so much if
you could help me with that! I write patterns all the time (in the
cooler months) and would love to share them, but just don't have the
experience with writing them in a traditional,
readable-for-people-other-than-me format. If you can get in touch with
me it would be AMAZING.
So,
anyway, I'm going to be rewriting the pattern while knitting it in the
next few weeks with you all in mind, so where I wrote it badly hopefully
it will be much better! If you have been planning to try it, I'd
suggest maybe waiting until I've rewritten it. This is really high on
the priority list so it shouldn't take too long (when I first knit it,
it was for the competition, and I actually had to reknit it two days before I had to send it off - so I can knit it fast, I just have to buy some yarn).
Here is the pattern for the lace pullover that I made, as promised. It's a very loose fitting pullover, as you can see in the picture. Be warned, this is my first sweater pattern that I am posting, so I'm not sure if the grading is quite right. Be sure to look carefully at the finished measurements and the diagram, and also keep in mind if you do want to alter the width of the pattern that you can do that just by adding or subtracting 6 stitches to the underarm section, which is equal to a pattern repeat. Hope you like it!


Diamond lace pullover
Sizes: S/M, M/L, L/XL
Materials:
- approx. 600 (700, 800) yards bulky weight wool/wool blend yarn (I used recycled yarn, so the amount is not for sure, but this should be way more than you need)
- size US 17 circular and double-pointed needles
- size US 10.5 circular and double-pointed needles
Gauge: 7 stitches, 13
rows to four inches in diamond lace pattern on larger needles
Finished measurements:
bust, 40” (46, 52); length, 24”
terms:
- yo—yarn over
- k2t—knit two together
- k2tbl—slip two stitches knitwise, insert left needle, knit
- k3t—slip one stitch, knit next two stitches together, pass slip stitch over
Using the smaller needles, loosely cast on 74 stitches. Join
for knitting in the round. Place marker.
k2, p2 around for 8 to 10 rounds.
decrease round—with larger needles, *k2, k2t* until you
reach the last four stitches before marker, k4.
Now we start the lace.
The neckline has short row shaping, as well as the raglan shaping, so
we'll separate the neckline portion of the lace into three sections: back,
front shoulder a, front shoulder b.
These are worked and then the piece is worked in the round.
Note: every time the
pattern says to turn, start by passing yarn to other side, then slip one
stitch, pass yarn back, slip stitch back, and then turn. This wraps a loop of yarn around one stitch,
which prevents a hole from forming where you turn the work.
Turn work. Remove
marker. The type of increases that we're
doing doesn't allow for a regular marker, but you can tie a contrast bit of
yarn a row down to mark the beginning round.
You may have to untie it and move it up as you go. We'll call the yarn overs that are done over
the markers “yom” to distinguish them.
Row 1 (wrong
side): Purl 15 stitches. Turn.
Row 2 (right
side): knit 2, yo (yom), tie a marker below, k5, yo, k2t, k4, yom, k3, picking
up one. Turn.
Row 3 and all
wrong side rows: *purl to marker, k1 p1 into that yom*, p 3. Turn.
Row 4: k1,
k2tbl, yo, k1, yom, *k1, yo, k2t, k1, k2tbl, yo* 2 times, k1, yom, k1, yo, k2t,
k2. Turn
Row 6: k1,
k2tbl, yo, k3, yom, *k3, yo, k3t, yo* 2 times, k3, yom, k3, yo, k2t, k2. Turn.
Row 8: k1,
k2tbl, yo, k5, yom, k5, *yo, k2t, k 4* 2 times, yom, k5, yo, k2t, k2. Turn.
Row 10: k1,
k2tbl, yo, k1, yo, k2t, k1, k2tbl, yo, k1, yom, *k1, yo, k2t, k1, k2tbl, yo* 3
times, k1, yom, k1, k2tbl, yo, k1, yo, k2t, k2.
Turn.
There are now
42 stitches.
Shoulder A:
Row 1: *purl
to m, k1p1 into yom* two times, p 20.
Now we're doing shoulder a.
Row 2: k2,
yom, tie marker below, k2. Turn.
Row 3: p2,
k1p1 into yom, p3. Turn.
Row 4: k1,
k2tbl, yo, k1, yom, k1, yo, k2t, k2.
Turn.
There are now
58 stitches.
Shoulder B:
Repeat shoulder A exactly, starting with p20, etc.
We're now
ready to start working in the round. You
may notice that the beginning of the round is now in the middle of the sleeve,
which is not a good place, but we're going to move it to the front shoulder
raglan, where you won't be able to tell.
Here's what we do:
So we are
ready to do a worked row in the
round. Go ahead and work in pattern (see
charts) around until you get to the front shoulder seam that is just before the
beginning of the round. This is going to
be our new beginning of round. Untie the
marker and tie a new one on that is a different color to distinguish this
shoulder. When you do the increase, do the yom at the end of the worked round,
then switch to just knitting, so the change is really just after the
increase. You can't tell at all that
there is anything different here once it's all finished.
Work in
pattern until you have almost three full diamonds along the front shaping. End with row 13 (worked round is next). The last stitch we did is the p1 into the
yom; slip it to the other needle. Slip
all of the shoulder stitches onto a holder—that means to the spot where we would
do the yom, in between the k1 and the p1 into the yom before. With the working strand of yarn, CO 3 (9, 15)
stitches, and continue in pattern until you get to the next marker. Do the same as with the first shoulder. Continue working until you come to the other
underarm.
The beginning
of the round will now be 2 (5, 7) stitches into the cast on stitches. Continue working until you have finished a
total of three diamonds from center front, and then one more repeat up to round
11—or you can slip the stitches onto a piece of yarn and try it on to see if
you like the length.
Switching to
smaller needles, *k1, k1p1 into next stitch, p1* around. K2, p2 ten to twelve rounds.
Bind off.
Congratulations! You have now successfully finished the body!
Sleeves:
Tie a strand
down at the beginning of the shoulder section.
Work in pattern across. CO 3 (9,
15) stitches, join for working in round.
The beginning of the round will be 2 (5, 7) stitches into the cast on
stitches. Do the next round; tie a piece
of string around the center stitch in the underarm. Tie it like we did for the other
markers. Work the next two rounds, but
stop at one stitch away from the center stitch.
At the end of every non-worked round, we're going to k3t—that decreases
one stitch from each side of the center stitch.
Continue like this until you have 18 (24) stitches, then work straight
until there are 4 and a half diamonds, or again you can try it on to see if you
like the length.
Changing to
smaller needles, *k1, k1p1 into next stitch, p1* around. Continue for 10-12 rounds.
Bind off
loosely.
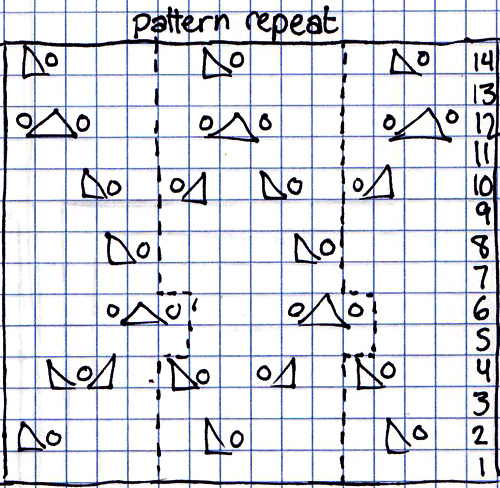
Here are the charts. Yep, real high tech images lol! But that's how I make patterns.